
Conferencing Guide
Conferencing is one of the "Power Features" of myJabber and we do it with style. Conferencing is done on the core server and, while not a feature laden as IRC (Internet Relay Chat), it does create very useful environments for corporate level help desks, just friends getting together to make some noise or anywhere in between.
Where to begin... Let's start at the basics.
Figure 1 How do I join an existing room?
Lets start at the myJabber menu Item and follow it down to "Chat Rooms" This menu will present us with 3 options

![]() Browse Chat Rooms: you have the option to browse though
the existing rooms on a given server
Browse Chat Rooms: you have the option to browse though
the existing rooms on a given server
![]() Favorites: You can keep and store your favorite chat
rooms in myJabber for easy access at a future time.
Favorites: You can keep and store your favorite chat
rooms in myJabber for easy access at a future time.
![]() Join
Chat Room: this opens a simple manual dialog that will allow you to
log into or create a room of your choice. Alternatively you could
create a chat room, we will cover this later.
To join a Chat room you could also place your cursor over the room you wish
to join and right click, choose Join.
Join
Chat Room: this opens a simple manual dialog that will allow you to
log into or create a room of your choice. Alternatively you could
create a chat room, we will cover this later.
To join a Chat room you could also place your cursor over the room you wish
to join and right click, choose Join.
Screen shot of a Conference Room(aka Chat Room)
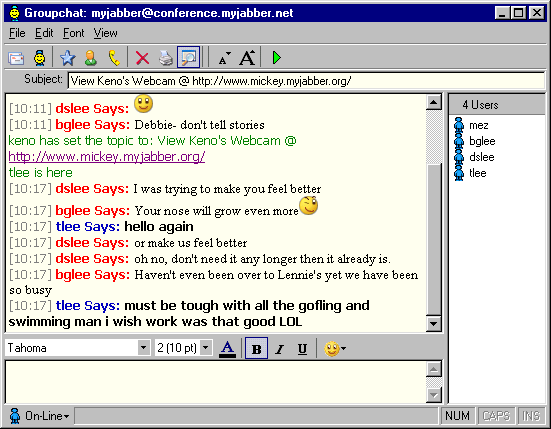
Figure 2 Create / Join a Chat Room

 Server:
Use this box to set the conference server you wish to connect to. This should
default to the conference server of the network you are currently connected
to,
Server:
Use this box to set the conference server you wish to connect to. This should
default to the conference server of the network you are currently connected
to,
Chat Room:
Enter the name of the room you wish to Join or Create.
Nick Name:
this is the name that you will be known by in THIS room.
Auto Join:
Select this and the client will connect to the room on start up.-
Press
 to enter the chosen or created chat room.
You can also join a conference room you have set up in your conference room directory just double click on the conference room you want to use.
****** More information on the creation of Chat Rooms ******
Figure 4 Adding A Chat Room to Your Favorites
- To add
a chat room temporarily Go to Tools on the file drop down menu, choose Options,Create/Join
Chat Room
- This screen
will display not only the new Temporary room you have added but it will also
show your favorite Chat Rooms.
- You can
change your Nick Name by placing your cursor over the appropriate area and
type in your nick name. After you have made the necessary change
- Press
,
or
 if you change your mind.
 - Once you
have joined your chat room you have created click on the
 and this will add your chat room to your favorites
-
Figure 5 Create Chat Room
- Server:
Choose the drop down button to select where to add chat room
- Chat Room:
Enter the name of the chat room.
- Nick Name:
Enter the name you would like to be seen online in your conference room.
- Click.
Your temporary chat room is now on the public chat room site. It will
be shown on the public conference rooms for others to join in your topic with
you. AS shown below
- (remember this is only available as long as you or someone is in this room once it is empty the room is deleted).
-
figure 6 Public Chat Room Example

![]() Conference server:
This is the server that you wish to browse, currently it has to be manually
set to another server if you wish to browse it.
Conference server:
This is the server that you wish to browse, currently it has to be manually
set to another server if you wish to browse it.
![]() Chat
Room Listing: These are the rooms in the chosen server. Click on one you
wish to join then it will show you who is in that contact room if wish to talk
to those contacts click the
Chat
Room Listing: These are the rooms in the chosen server. Click on one you
wish to join then it will show you who is in that contact room if wish to talk
to those contacts click the![]() button to join the room you selected. If there are contacts in the room you
were going to select that you wish not to talk to then select another room.
button to join the room you selected. If there are contacts in the room you
were going to select that you wish not to talk to then select another room.
![]() Join Button:
Highlight the room you wish to join and click.. the Join Chat Room Dialog will
open.
Join Button:
Highlight the room you wish to join and click.. the Join Chat Room Dialog will
open.
![]() Refresh Button:
This will refresh the displayed rooms. Handy when you have entered a new server
in the Conference server Line.
Refresh Button:
This will refresh the displayed rooms. Handy when you have entered a new server
in the Conference server Line.
![]() Close: This
loses the Dialog box and returns you to your regularly scheduled insanity.
Close: This
loses the Dialog box and returns you to your regularly scheduled insanity.
![]() Remove Server:
This will remove any extra servers you may add on your myJabber program or conference
area. Just highlight the server you wish to delete then click
Remove Server:
This will remove any extra servers you may add on your myJabber program or conference
area. Just highlight the server you wish to delete then click![]() and the server will be removed
and the server will be removed
![]() Add Server:
To add a server just type in the server you wish to add in the blank box and
click
Add Server:
To add a server just type in the server you wish to add in the blank box and
click![]() and this will add the server to your conference rooms i.e. conference.myjabber.org
and this will add the server to your conference rooms i.e. conference.myjabber.org
The myJabber server browser.
Figure 7 Browse The Server
![]() Conference
server: This is the server that you wish to browse, currently it has to be manually
set to another server if you wish to browse it.
Conference
server: This is the server that you wish to browse, currently it has to be manually
set to another server if you wish to browse it.
![]() Chat Room
Listing: These are the rooms in the chosen server. Click on one you wish to
join then click the
Chat Room
Listing: These are the rooms in the chosen server. Click on one you wish to
join then click the![]() button to join the room you selected.
button to join the room you selected.
![]() Join Button:
Highlight the room you wish to join and click.. the Join Chat Room Dialog will
open.
Join Button:
Highlight the room you wish to join and click.. the Join Chat Room Dialog will
open.
![]() Refresh Button:
This will refresh the displayed rooms. Handy when you have entered a new server
in the Conference server Line.
Refresh Button:
This will refresh the displayed rooms. Handy when you have entered a new server
in the Conference server Line.
![]() Close: This
loses the Dialog box and returns you to your regularly scheduled insanity.
Close: This
loses the Dialog box and returns you to your regularly scheduled insanity.
![]() Remove Server:
This will remove any extra servers you may add on your myJabber program or conference
area. Just highlight the server you wish to delete then click
Remove Server:
This will remove any extra servers you may add on your myJabber program or conference
area. Just highlight the server you wish to delete then click![]() and the server will be removed
and the server will be removed
![]() Add Server:
To add a server just type in the server you wish to add in the blank box and
click
Add Server:
To add a server just type in the server you wish to add in the blank box and
click![]() and this will add the server to your conference rooms i.e. conference.myjabber.org
and this will add the server to your conference rooms i.e. conference.myjabber.org
Figure 8 Favorites

![]() On the left
you will see the current path to your favorites.
On the left
you will see the current path to your favorites.
![]() From the
myJabber menu item, go to Chat Rooms and then Favorites.
From the
myJabber menu item, go to Chat Rooms and then Favorites.
Favorites are saved by 2 methods:
![]() Manual
configuration from the Options Menu or
Manual
configuration from the Options Menu or
![]() Click
Click
![]() in a conference room you are currently in and choose "Add to Favorites." Located
on the tool bar.
in a conference room you are currently in and choose "Add to Favorites." Located
on the tool bar.
Figure 9 Screen Shot of a Conference Room:
![]() This is the
myJabber conference dialog, logged into the Development room at myjabber.net.
The whole ting should be rather familiar to anyone that has been in a chat room
before.
This is the
myJabber conference dialog, logged into the Development room at myjabber.net.
The whole ting should be rather familiar to anyone that has been in a chat room
before.
![]() The next
part is easy as well just type a message in the small screen at the bottom and
the reason for the chat or question, etc. and press enter or
The next
part is easy as well just type a message in the small screen at the bottom and
the reason for the chat or question, etc. and press enter or
![]() (send button). Wait for a response from the person you sent the message or request
to. A bell will chime when they send you a response.
(send button). Wait for a response from the person you sent the message or request
to. A bell will chime when they send you a response.
![]() After the
person responds to you, you just follow the previous step and continue to chat
back and forth. Enjoy the chatting but remember keep it clean this is a family
myJabber zone.
After the
person responds to you, you just follow the previous step and continue to chat
back and forth. Enjoy the chatting but remember keep it clean this is a family
myJabber zone.
![]() On the left
is the main chat room, this is where all of the Normal Chat Room nonsense
goes on.
On the left
is the main chat room, this is where all of the Normal Chat Room nonsense
goes on.
![]() On the right
is the User List, listing all of your friends or co-workers that occupy the
room at the present. The color of the
On the right
is the User List, listing all of your friends or co-workers that occupy the
room at the present. The color of the![]() indicates their status in the room, not the server status. So they can be
indicates their status in the room, not the server status. So they can be![]() (away)
in here, or showing
(away)
in here, or showing
![]() (online),
yet still available in the main server. (or visa versa)
(online),
yet still available in the main server. (or visa versa)
![]() Add to Favorites
Add to Favorites
![]() :
Adds the current room to your list of favorites.
:
Adds the current room to your list of favorites.
![]() Add a topic
or comment to room just press " /me" no space then a space then your comment
= i.e /me hello steve =
Add a topic
or comment to room just press " /me" no space then a space then your comment
= i.e /me hello steve =![]()
How to invite others to join you
Figure 10 Invite Dialog

![]() Invite a
Friend
Invite a
Friend
![]() :
This opens the Invite dialog, allowing you to invite one or more of your contacts
to the conference (chat) room. Double click on the contact you wish to invite
then click OK.
:
This opens the Invite dialog, allowing you to invite one or more of your contacts
to the conference (chat) room. Double click on the contact you wish to invite
then click OK.
